Building a local RAG enhanced chatbot

Rag'n roll
There’s no escaping the fact that AI has revolutionized many industries and will continue to drive significant change. Big tech companies are investing heavily in AI research and building large-scale infrastructure, often aiming to lock users into their proprietary ecosystems. While I rely on these cloud-based tools daily, this made me think: Can't I run tools like this locally? This approach will reduce my reliance on big tech and allow me to have greater control over my workflow.
The main advantages of running a Large Language Model (LLM) locally are clear:
- Privacy: your data doesn't leave your system.
- Cost effective: No expensive subscriptions are needed.
- Customization: You can fine-tune parameters throughout the entire chain (choice of model, chunk size, model temperature, etc.).
- Offline access: Use your chatbot even without an internet connection.
While online chatbots have become incredibly powerful, they often require substantial computing resources. I was pleasantly surprised by the results of running an LLM locally. I received genuinely helpful responses running it solely on my laptop.
I often get stuck in researching tools and technologies when undertaking these side projects. What helped me was setting a strict two-hour deadline to get a basic version up and running. This was my first time using Python, and I was honestly surprised by how fast and easy it was to get things up and running. I didn’t even consider throwing my laptop out the window once.
So let's get our hands dirty!
Solving the puzzle
Building software often feels like assembling puzzle pieces, and this is particularly true for LLM applications, where we chain various processes together. The first step is to set up our local AI environment so we can run LLMs locally.
Ollama
Ollama is a simple tool that makes it easy to run LLMs locally. On macOS and Linux, you can install it using this command:
curl -fsSL https://ollama.com/install.sh | sh
Choosing your model
Choosing an appropriate model is crucial and depends on your available hardware and intended tasks. Running larger models requires more system resources, primarily RAM and GPU. For reference, I am using a MacBook Pro with a M3 Max chip and 36GB of memory.
When choosing a model, consider these key parameters:
- Architecture
- Dense models: These models activate all their parameters for every task. They offer predictable performance, but their resource requirements scale directly with the parameter count.
- Mixture of experts (MoE): These models divide the network into many specialized sub-networks called "experts" and activate only a select few for each input. This design allows models to scale to trillions of parameters while maintaining computational efficiency. A gating mechanism determines which experts to use, enabling the model to be both powerful and resource-friendly.
- Parameter count: Generally, more parameters can mean a more capable model, but also higher resource demand.
- Context window: This refers to the amount of text the model can consider at one time when generating a response. A larger context window allows for more coherent and contextually aware outputs for longer conversations or documents.
This is the beauty of taking matters into your own hands: you get to experiment with different models and see what best fits your use case and environment. So, pick your poison!
I chose llama3.2:latest model.
(Note: Ensure llama3.2:latest is the precise model tag you are using, or consult the Ollama
library for standard available tags like llama3:8b or other specific Llama 3 variants if needed.)
You can install and test a model with these command:
ollama pull llama3.2:latest # Installs the model
ollama run llama3.2:latest # Allows you to interact with it directly
This is cool, but how can we integrate these with our application? We can run Ollama as a background server, which exposes an API we can use. Run this command:
ollama serve
Typically, Ollama listens on http://localhost:11434.
Creating our application
Since all the cool kids seem to be using Python nowadays, I decided to explore what it's all about. Firstly, it's highly advisable to run Python in a virtual environment. This practice ensures that all dependencies are managed within this environment and remain decoupled from your system's global Python installation.
Create and activate an environment:
python -m venv .venv # Creates the virtual environment
source .venv/bin/activate # Activates the virtual environment (on macOS/Linux)
Now we can install all the dependencies we need.
pip install langchain langchain-community langchain-ollama fastapi uvicorn pypdf chromadb python-dotenv
Here’s a breakdown of these packages:
langchain langchain-community langchain-ollama: Langchain is a popular framework that drastically simplifies working with LLMs. It abstracts away most of the complexities behind a common interface to communicate with models, embedding models, vector databases, and more. While this abstraction can be a disadvantage for highly complex use cases, it's excellent for this application.fastapi: A modern, fast (high-performance) web framework for building APIs with Python. We'll use it to communicate between our frontend and backend.uvicorn: A web server for Python, required to run FastAPI applications.pypdf: A PDF library that enables us to load and split PDF files.chromadb: An AI-native open-source embedding database, designed to store and query generated vector embeddings efficiently.python-dotenv: A utility to load environment variables from a .env file, useful for managing configuration settings.
These are all the components we'll use to build our local chatbot. As you can see, this involves several independent components that we need to chain together. This modularity offers great flexibility, allowing us to swap out components if something better comes along.
Building our RAG system
Using an LLM as-is is cool, but it becomes significantly more useful with Retrieval Augmented Generation (RAG). RAG is a technique that enhances an LLM's capabilities by providing it with external knowledge, instead of relying solely on its training data. With RAG, an LLM can look for relevant information in, for example, a PDF document you provide. And because we're running our application locally, you don't have to worry about your personal data ending up on a server somewhere.
With a local system, you can truly personalize your chatbot. You can query personal documents like contracts, invoices, medical records, and more. Or, like me, you can upload the rules of UNO to quickly check if my girlfriend is bending the rules of the game.
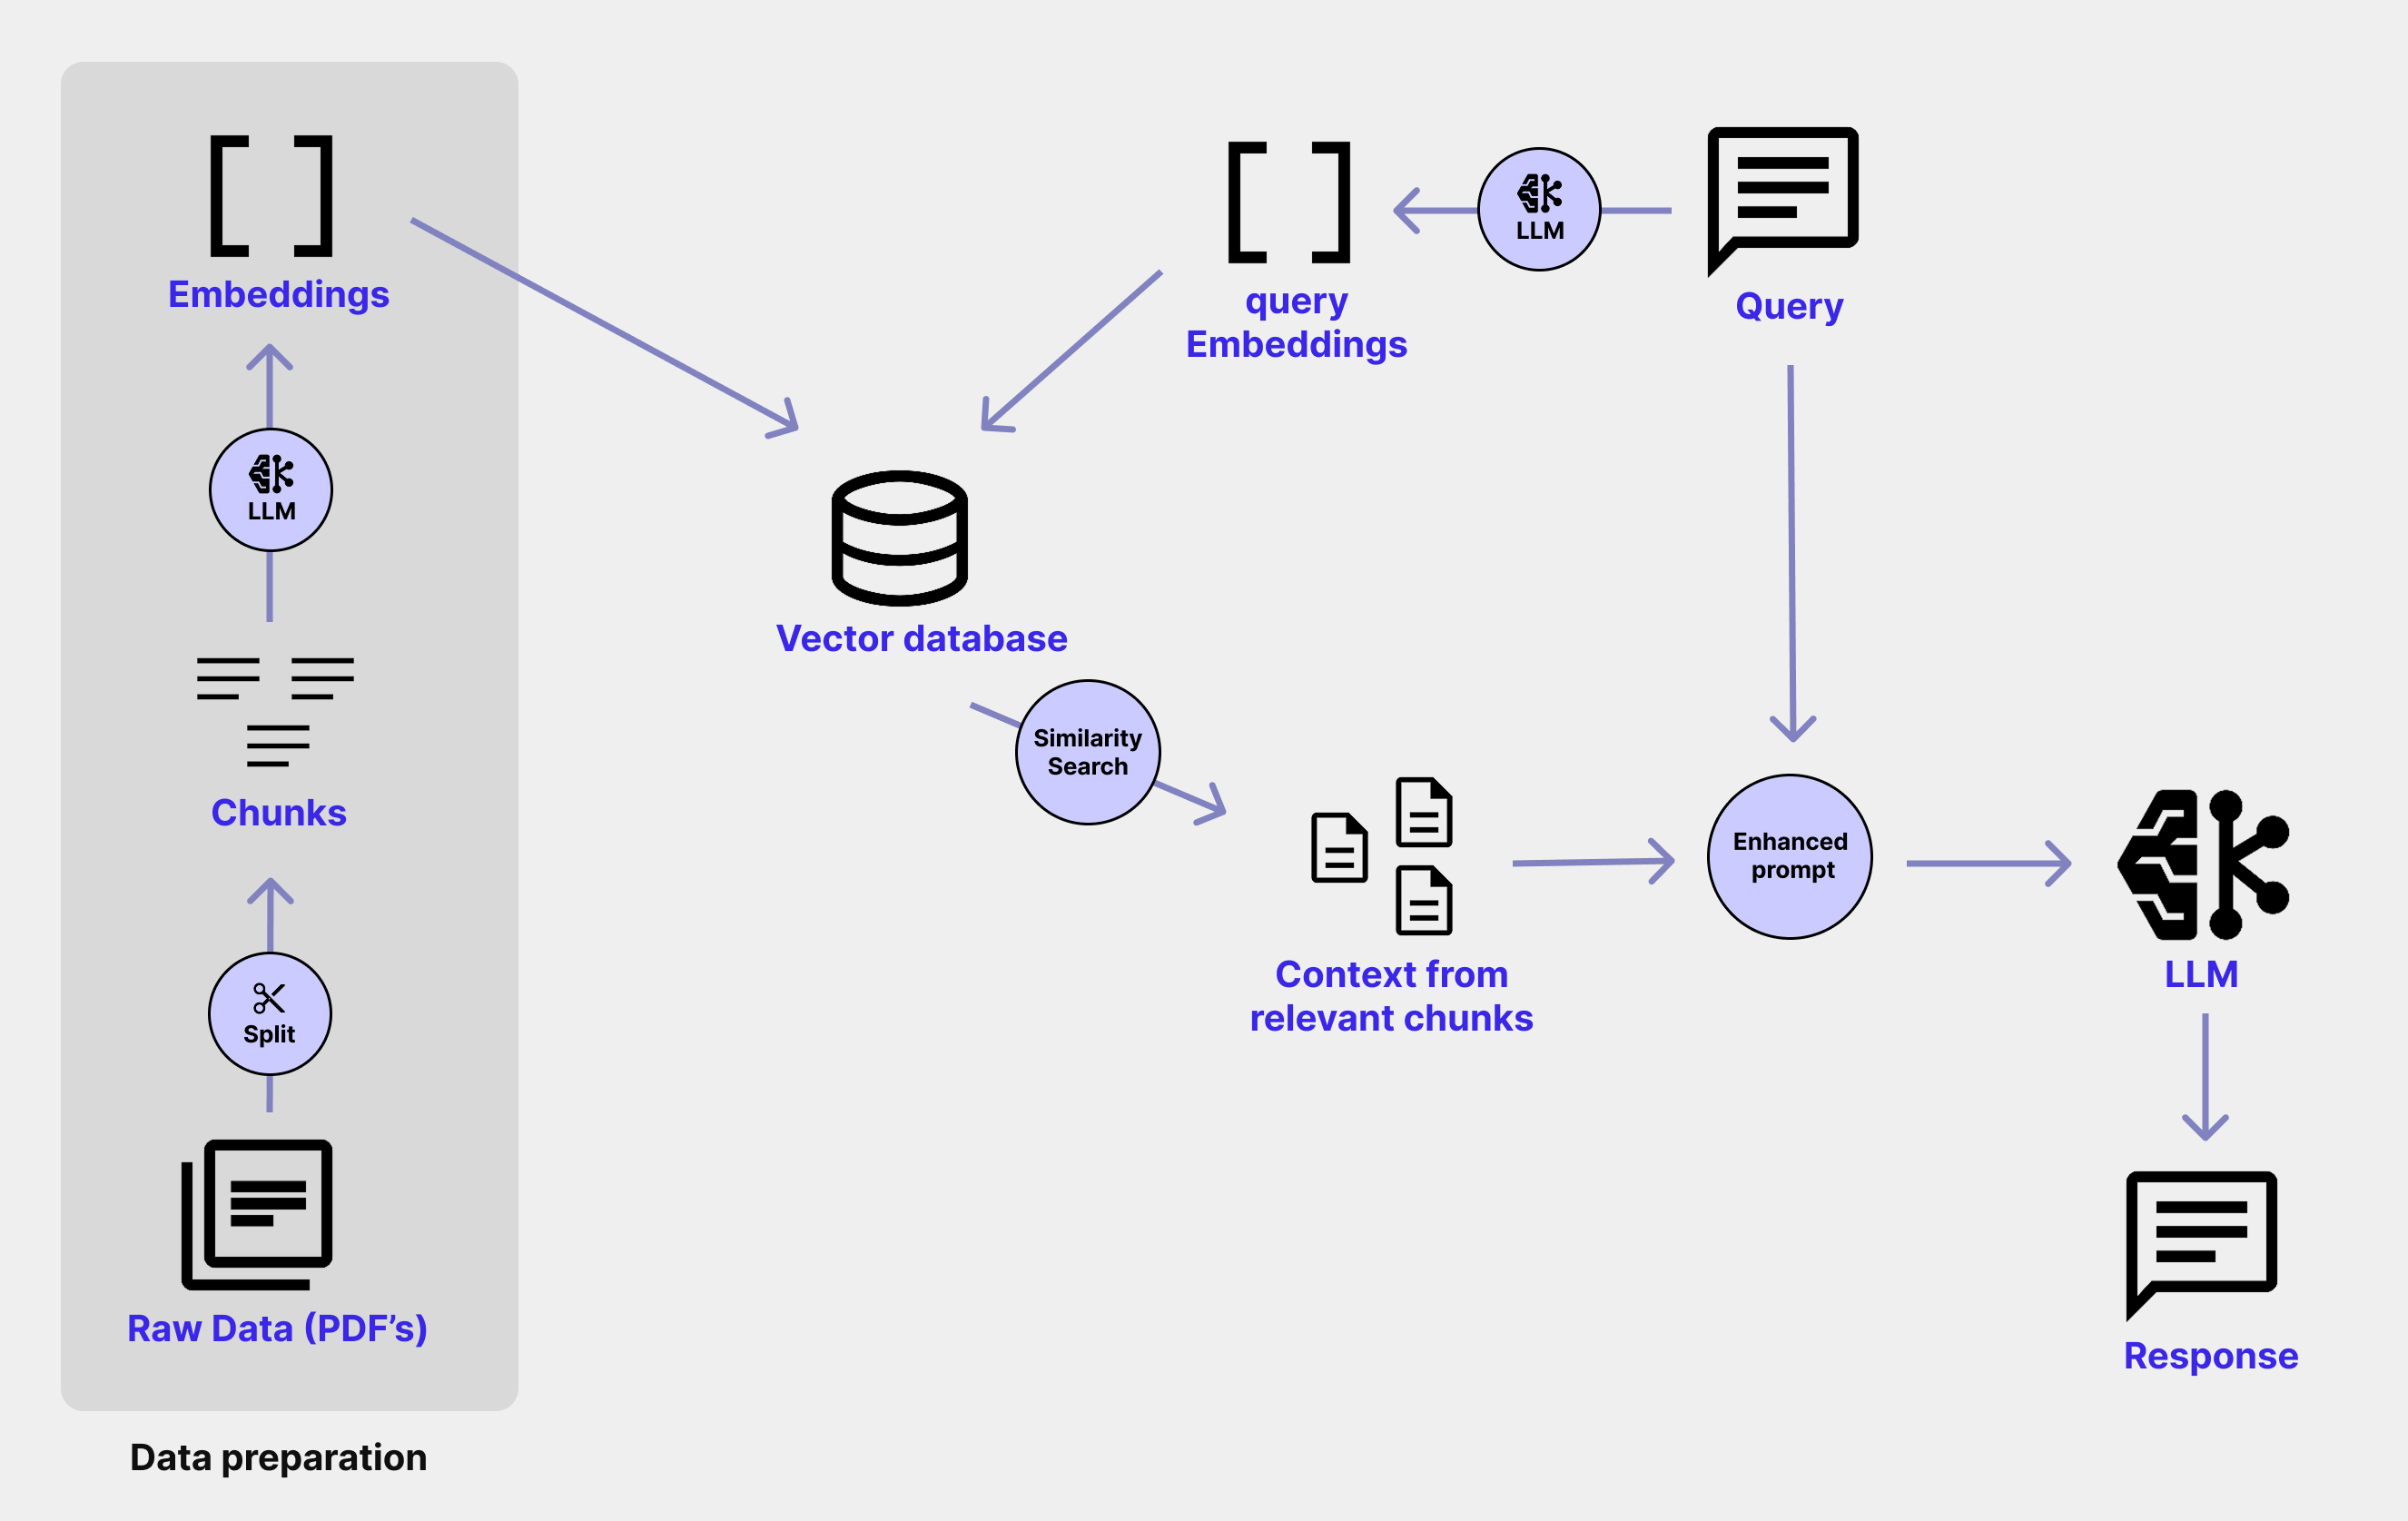
For the LLM to understand our data and generate a response, it has to go through the following process:
- Prepare the data
a. Loading and splitting documents into manageable chunks.
b. Converting these chunks into numerical representations (embeddings) using an embedding model.
c. Storing these embeddings in a vector database for efficient searching. - Embed the query: When a query comes in, convert the query into an embedding using the same embedding model.
- Search: Search the vector database to retrieve the most relevant document chunks based on the query embedding.
- Generate response: Provide these relevant chunks (the "context") along with the original query to the LLM to generate an informed answer.
Step 1: Prepare the data
Create a data folder inside your project. This folder should contain all the custom documents you want your chatbot to query.
Now we can load these documents into our Python application and split them into chunks.
Chunking means splitting large pieces of text (like PDFs or articles) into smaller, manageable parts. This helps ensure that the language model can process and search through the data effectively. "As with normal human beings you can't feed a model an entire lasagna all at once, you need to cut it into pieces."
Langchain provides the RecursiveCharacterTextSplitter to break a large text into smaller, manageable chunks.
It does this by trying to split the text at preferred boundaries (like paragraphs, sentences, etc.) using a list of separators.
If it can't split cleanly at a higher-level separator, it tries the next one in the list, hence "recursive."
Two important parameters that have a big impact on the quality of our embeddings later are:
chunk_size: The maximum number of characters allowed in each chunk. Choosing an appropriate chunk size is vital for your model and use case. Chunks that are too small can make embeddings less informative and reduce relevance in similarity searches. Chunks that are too large may be too long for some embedding models or exceed token limits for LLMs. Common chunk sizes typically lie between 500 and 1000 characters.chunk_overlap: The number of overlapping characters between consecutive chunks. This helps preserve context between chunks, preventing important information from being lost at the boundaries. A good guideline is a 10% - 20% overlap of thechunk_size.
# populate_database.py

# Define DATA_PATH and VECTOR_STORE_PATH, e.g., from environment variables or config
# DATA_PATH = "data/"
# VECTOR_STORE_PATH = "vectorstore/chroma/"

def load_documents():
    document_loader = PyPDFDirectoryLoader(DATA_PATH, glob="*.pdf")
    return document_loader.load()

def split_documents(documents: list[Document]):
    text_splitter = RecursiveCharacterTextSplitter(
        chunk_size=800,
        chunk_overlap=80,
        length_function=len,
        is_separator_regex=False,
    )
    return text_splitter.split_documents(documents)
Next, these chunks need to be converted into vectors, called embeddings.
An embedding is a numerical representation of a piece of text (paragraph or sentence), that captures its meaning. These embeddings can be compared mathematically to find similar content.
Semantically similar text chunks will have vectors that are close together in multi-dimensional space.
An embedding model generates these vectors. There are a lot of embedding models to choose from, in this case I went with nomic-embed-text.
We use the OllamaEmbeddings function, provided by Langchain
# populate_database.py (continued)

def get_embedding_function():
    embeddings = OllamaEmbeddings(model="nomic-embed-text")
    return embeddings
Now we need to set up the vector database Chroma.
Chroma is an open-source vector database designed for storing and querying embeddings. It supports fast similarity searches and metadata filtering.
# populate_database.py (continued)

def add_to_chroma(chunks: list[Document]):
    # Load the existing database.
    db = Chroma(
        persist_directory=VECTOR_STORE_PATH, embedding_function=get_embedding_function()
    )

    # Calculate Page IDs to avoid duplicates.
    chunks_with_ids = calculate_chunk_ids(chunks)

    # Add or Update the documents.
    existing_items = db.get(include=[])  # IDs are always included by default
    existing_ids = set(existing_items["ids"])
    print(f"Number of existing documents in DB: {len(existing_ids)}")

    # Only add documents that don't already exist in the DB.
    new_chunks = []
    for chunk in chunks_with_ids:
        if chunk.metadata["id"] not in existing_ids:
            new_chunks.append(chunk)

    if len(new_chunks):
        print(f"Adding new documents: {len(new_chunks)}")
        new_chunk_ids = [chunk.metadata["id"] for chunk in new_chunks]
        db.add_documents(new_chunks, ids=new_chunk_ids)
        db.persist()
    else:
        print("No new documents to add")
All chunks are also provided with an ID via the calculate_chunk_ids function. This way, we only persist new chunks, avoiding redundant data.
# populate_database.py (continued)

def calculate_chunk_ids(chunks):

    # This will create IDs like "data/filename.pdf:6:2"
    # Page Source : Page Number : Chunk Index

    last_page_id = None
    current_chunk_index = 0

    for chunk in chunks:
        source = chunk.metadata.get("source")
        page = chunk.metadata.get("page")
        current_page_id = f"{source}:{page}"

        # If the page ID is the same as the last one, increment the index.
        if current_page_id == last_page_id:
            current_chunk_index += 1
        else:
            current_chunk_index = 0

        # Calculate the chunk ID.
        chunk_id = f"{current_page_id}:{current_chunk_index}"
        last_page_id = current_page_id

        # Add it to the page meta-data.
        chunk.metadata["id"] = chunk_id

    return chunks
(Note: Ensure populate_database.py is run as a script to process your documents and build the
ChromaDB before running the main application.)
Step 2: Embedding the incoming query
When a user submits a query, it also needs to be converted into an embedding using the same model, so we can compare it to the document embeddings.
# query_data.py
# Re-initialize Chroma for querying

 embedding_function = get_embedding_function()
    db = Chroma(persist_directory=VECTOR_STORE_PATH,
                embedding_function=embedding_function)
Step 3: Similarity search
Now we execute a similarity search on the database to retrieve the most semantically similar chunks to the user's query.
# query_text is the user's question
# k=5 retrieves the top 5 most similar chunks
results = db.similarity_search_with_score(query_text, k=5)
Step 4: Setting up the prompt and executing the model
The final part of the chain is creating the prompt. The prompt consits of the context (the relevant document chunks) and the original user query.
The LLM will take this combined prompt and, in this case stream the results (you can also use the invoke function to get the entire result at once).
At this stage, we can customize various parameters of our model. For example, we can set the temperature.
Temperature controls the randomness of the output generation: lower values (e.g., 0.0 - 0.3) make responses more deterministic and focused, while higher values (e.g., 0.7 - 1.0) increase creativity and variability.
It's also possible to set the context window size (num_ctx for Ollama) if needed, though Langchain often manages this based on the model.
# query_data.py

context_text = "\n\n---\n\n".join(
    [doc.page_content for doc, _score in results])
prompt_template = ChatPromptTemplate.from_template(PROMPT_TEMPLATE)
prompt = prompt_template.format(context=context_text, question=query_text)

model = Ollama(model="llama3.2", temperature=0.3, num_ctx=2048)

sources = [
    {
        "source": doc.metadata.get("id", None),
        "content_preview": doc.page_content[:200] + "..."
    }
    for doc, _score in results
]

yield json.dumps({"type": "sources", "data": sources}) + "\n"

full_response_text = ""
for chunk in model.stream(prompt):
    full_response_text += chunk
    yield json.dumps({"type": "chunk", "data": chunk}) + "\n"

yield json.dumps({"type": "done", "data": full_response_text}) + "\n"
(Note: the PROMPT_TEMPLATE is used to structure the question you send to the LLM. It’s like
giving your chatbot a script or some context so it answers in the way you want.)
Creating an api endpoint
Now we can expose an api endpoint, with the help of fastapi. This allows us to send a query request from a frontend application.
# api.py

@app.post("/api/chat_stream")
async def chat_with_llm_stream(chat_query: ChatQuery):
    print(f"Received streaming query: {chat_query.query}")
    try:
        return StreamingResponse(query_rag_stream(chat_query.query), media_type="application/x-ndjson")
    except Exception as e:
        print(f"Error during streaming LLM query: {e}")

        async def error_generator():
            yield json.dumps({"type": "error", "error": f"Error starting stream: {str(e)}"}) + "\n"
        return StreamingResponse(error_generator(), media_type="application/x-ndjson", status_code=500)
End result
These are snippets of code that highlight the most important parts of the application. I also didn't cover the frontend, but you can find the complete code in this repository. Below you can see a little demo where I ask questions about Formula 1. I used the F1 sporting regulations as context.
Conclusion
This was a really fun little side project, and by giving myself a strict deadline, I managed to avoid falling into the research rabbit hole. In just a few hours, I built a basic working local chatbot enhanced with RAG, thanks to some incredible open-source tools. Over the coming weeks and months, I’ll find out whether these were the right choices. If not, I can always swap them out or even build custom solutions for specific parts.
After the initial setup I further improved the Python code and added an Angular frontend. At the end of the day the most important task for us as software developers is solving problems and delivering value to our customers. So, it's good to build something quickly to validate ideas, but along the way, we must take note of our decisions and be prepared to come back and change the right parts of our application as requirements evolve or better solutions emerge.
Possible improvements
This is just a basic starting point, but building it sparked my curiosity to dive deeper into developing AI-powered applications. Even though it’s a small project, there’s a lot of potential for improvement and expansion. Some ideas I’m already thinking about are:
- Supporting a wider range of data sources like images, CSV files, Word documents, and more.
- Letting users upload documents directly through the UI for a smoother experience.
- Improving how context is retrieved, by experimenting with different chunking strategies, embedding models, or even reranking techniques.
- Integrating agents and tools to handle more complex, multi-step tasks.
- And who knows what else, the possibilities are endless once you start playing with this stuff.
🎶 Bonus song
So now we’ve seen what a local chatbot can do and it’s practically shouting, “Here we are now, entertain us!” . Just like Nirvana shook up the music world, AI is reshaping the way we interact with technology.
Nirvana - Smells Like Teen Spirit